Notice»

Recent Post»

Recent Comment»

Recent Trackback»

Archive»

« 2024/4 »
1 2 3 4 5 6
7 8 9 10 11 12 13
14 15 16 17 18 19 20
21 22 23 24 25 26 27
28 29 30


6 ways to transfer files to and from iPad

Creativity | 2011. 5. 18. 05:25 | Posted by 스마트 안전보건

It’s true that you can use your iPad instead of your Mac to take care of many common computing tasks. But unless you’re ready to ditch Mac OS X entirely, you’ll still need to transfer files back and forth between your iPad and your Mac if you’re going to get work done.

Unfortunately, transferring and synchronising files between the Mac and the tablet isn’t easy. There are several different ways to do it, but none are perfect, and each has its deficiencies. Frankly, this is one area where Apple could vastly improve the iPad experience. Until that happens, here are your choices when it comes to transferring files between your various devices.

iTunes

Apple’s officially endorsed route for file-transfers between iPad and Mac is via iTunes file-sharing. Unfortunately, it’s an amazingly clunky process.

For one thing, it only works with apps that support it. All of Apple’s iPad creation tools—Pages, Keynote, Numbers, GarageBand and iMovie—use iTunes to move files back and forth. Some third-party apps—e-readers, text editors and media creation tools—do too.

But even then, different apps use iTunes in different ways: Apple’s apps, for example, require you to select Save to iTunes when saving a document; other apps make their files available to iTunes automatically.

Worse, though, is the constant manual effort required to keep files in sync. By now, you probably know the routine: Connect your iPad directly to your Mac and open iTunes. Select your iPad in the iTunes source list and click on the Apps tab. Scroll down past the list of installed apps and look for the File Sharing section. Tap the app you want to copy a file from, so its files appear in the Documents pane. Drag one or more of those files to the Desktop (while holding down Option key) to copy them there, or use the Save To button to open a traditional save dialog. If you update a file on your Mac and want to send it back to the iPad, you must then drag that changed file back into iTunes, onto the correct app’s document list again.

It’s hardly elegant.

I have yet to find any solution—an AppleScript, an Automator workflow, a third-party utility—that makes this process any easier. For that reason, I use iTunes file-sharing as an extra backup for lengthy Pages documents and GarageBand projects, but for little else. The workflow required to work on a single file from both your Mac and your iPad is simply too awkward for more frequent use.

Cloud Storage

When I think about file synchronisation, I immediately think of Dropbox (free for 2GB). The service is great at keeping files in sync between my computers. So how does it fare at syncing files between Macs and iPads?

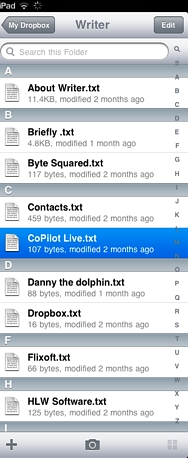
The iPad Dropbox app gives you access to your synchronised files, but no way to save edits you make on your tablet.

Unfortunately, Dropbox on the iPad is merely adequate—but not through any fault of its own. The Dropbox app, like numerous other cloud storage services (including MobileMe iDisk), offers an easy way to access any files and folders you store with the service. Dropbox’s app makes it a cinch to view any data that’s in iOS-friendly formats, including Word and Pages documents, PDFs, text files, and images. Even better, Dropbox and others like it offer you the option of opening your synced files in their compatible iPad apps; you can, for example, use the Dropbox app to send a word-processing document to Pages.

The flaw in this process is that there’s no way to send the updated file back to Dropbox again from within Pages again. Because of limitations in how iOS currently operates, cloud-storage apps are a one-way street on the iPad. It’s simple to get files from Dropbox into an app, but you can’t send them back to Dropbox when you’re done.

There is one sort-of workaround. In apps that support WebDAV–such as Pages—you can use DropDAV (free for 2GB) to access your Dropbox folder. DropDAV lets you interact with your Dropbox files via a traditional WebDAV connection. Since Pages lets you open files from a remote WebDAV server, you can get your document and edit it on your tablet. Just remember that you’re working on a local copy. When you’re ready to save, you must manually publish your document back to the DropDAV-created WebDAV server. It’s definitely the easiest way to approximate the Dropbox Mac experience on your iPad, but it’s still far from seamless.

Cloud-Compatible Apps

There are some iPad apps that have built-in support for cloud storage (most commonly Dropbox). In fact, Dropbox’s Website lists more than 130 apps that integrate with the service in some way.

There’s a slew of Dropbox-compatible iPad text editors, for example, including Elements ($5.00), iA Writer ($1.19), and Textastic ($12.99). With those editors, syncing feels seamless; your changes save directly into Dropbox; changes you make on your Mac are picked up almost immediately on your iPad. There’s no need to connect your iPad to your Mac; the process feels effortless.

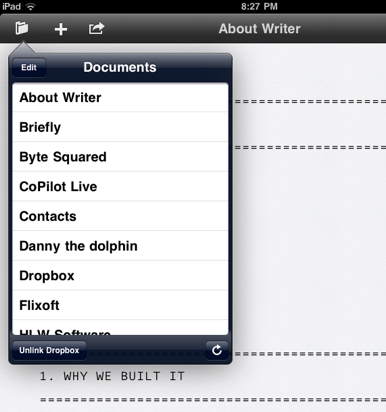
Some iPad text editors, such as iA Writer, will you let you save files directly to Dropbox.

Besides text editors, the list of Dropbox-compatible apps includes full-fledged word processors such as DocumentsToGo ($19.99), QuickOffice ($5.99), and Office2 ($7.99); file readers like ReaddleDocs ($5.99) and GoodReader ($5.99); audio note apps like DropVox ($1.19), Audio Memos ($1.19), Mobile Recorder ($1.19), and Smart Recorder ($3.99), and many more. When apps let you open and save documents directly from and to Dropbox, sane file management becomes painless.

Apple’s iPad apps don’t integrate with Dropbox, but they do work with MobileMe iDisk. Unfortunately, their integration with it isn’t nearly as smooth as you get with the best of the Dropbox apps. Publishing to iDisk is too much like iTunes File Sharing; you’re copying your file to the remote server, instead of maintaining a single, always-in-sync version.

But what Apple’s iWork suite lacks in syncing quality, it attempts to make up for in the number of ways you can sync: Besides iDisk, you can share iWork documents via iWork.com, send them to iTunes, or copy them via WebDAV. None of those options matches the simplicity of the Dropbox-enabled apps I’ve used. The DropDAV service mentioned earlier helps a bit, but lacks all the niceties that true Dropbox integration can offer.

Email

Unless and until Apple and other vendors build full two-way sync into their apps, the next best thing is email.

Email, of course, is no closer to true realtime synchronising than iTunes File Sharing; you’re still sending copies of your file back and forth, and you have to be careful that you’re always working on the latest version. But emailing offers a couple distinct advantages over the iTunes model.

First, you don’t have to connect your iPad to your Mac. Second, emails include date-stamps, so you don’t need to guess whether you’re working with the most recent version of a file; you can see precisely when you sent it to yourself.

If you plan to rely on email file transfers a lot, it may be worth creating special rules in your mail client of choice to handle these special messages. For example, in Gmail I created a filter that looks for messages that are both from me and to me, and that contain attachments. Those messages get a Files tag and are archived; this way, the Mail app on my iPad shows them neatly tucked into a folder with the same name.

FTP

Good old FTP is another option for transferring files to and from your iPad. There are plenty of iPad FTP clients in the App Store, including FTP On The Go Pro ($12.99), FTP Deluxe HD ($1.19), and FTP Write ($5.99). These apps let you connect to a remote FTP server, and then edit the files stored there.

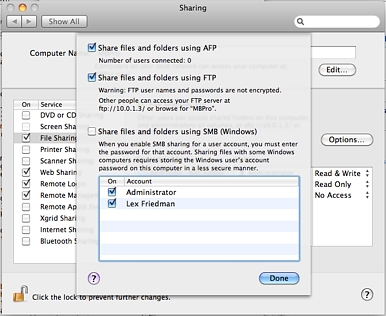
If you set up your Mac to share via FTP, you can send files to and from your iPad using an FTP app.

If you have access to a remote FTP server (through your Web hosting company or other means), both your Mac and iPad can connect to it. But that means you’ll need to download files to your Mac whenever you want to work on them. You might instead choose to configure your Mac itself as an FTP server. To do so, go to the Sharing system preference and make sure that File Sharing is turned on. Then click the Options button and put a checkmark by Share Files and Folders Using FTP. System Preferences will then tell you the FTP address for your Mac. Note that, unless your home has a static IP address and your router is configured properly, it may be difficult (if not impossible) to connect to your Mac as an FTP server when your iPad isn’t on the same wireless network.

Using FTP from the iPad can work, because it insures that you can work on just one copy a given file at any given time. But if you can’t get to your files when you’re online but out of the house, that’s a serious problem.

iPad-as-thumbdrive

Numerous apps—including iFlashDrive ($2.49), and Briefcase ($5.99)—let you use your iPad as a pseudo-thumbdrive, so that you can transfer files to and from the iPad. These apps and others like them can often connect to your Mac (if you enable file-sharing) over your local Wi-Fi network; some can connect by Bluetooth as well. A few of them even support remote access—including the ability to connect to SFTP servers.

But this process still feels a lot like a wireless alternative to iTunes File Sharing: You can copy files back and forth, but must manage the process manually.

Source: http://www.macworld.com.au/


, , , , , , , ,

:

Apple will more focus on Design and User experience for decades to come

Creativity | 2011. 4. 3. 01:50 | Posted by 스마트 안전보건

On April 1, 1976, Steve Jobs, Steve Wozniak and Ronald Wayne established a small company to sell personal computer kits hand-built by Wozniak. That company, as you probably know, was Apple Computer.

jobswithphone-360.jpg

Thirty-five years later, Apple is now the most valuable technology company in the world. Its market capitalization exceeds $317 billion, trumping longtime rival Microsoft by more than $100 billion. And Apple’s iconic products sit on the desks and in the pockets of millions of people across the world.

Most people know bits and pieces of the Apple story, but the company has a complicated history. Some of us may not know, for example, that Apple had a third co-founder, Ronald Wayne, who got cold feet and sold his 10% stake in Apple less than two weeks later. Everybody knows Steve Jobs, but they may not know Mike Markkula, one of Apple’s first angel investors and the company’s second CEO.

In the 35 years of Apple’s existence, the company has gone through hell and back. The launch of the Macintosh in 1984 and the coinciding “1984″ Super Bowl commercial remain symbols one of Apple’s highest points, but only a year later, then-CEO John Sculley forced Steve Jobs out of the company. A decade later, in 1996, the company was on the brink of destruction when it acquired NeXT and brought Steve Jobs back. In 1997, Microsoft invested $150 million in Apple to keep it afloat (something it probably now regrets), and soon after came Apple’s golden years with the iPod, iMac, MacBook, iPhone and now the iPad.

We don’t necessarily want to dwell on Apple’s past; you can visit Wikipedia if you want a lesson in Apple Inc.’s history. Instead, let’s focus on what Apple might do in the next 35 years.


What’s In Store For The Next 35 Years?

For the last 35 years, Apple has almost always been the underdog. While it languished, Microsoft flourished. In fact, Apple surpassed Microsoft in market cap for the first time last May.

For the next few decades, however, the technology titan will be incumbent. Apple has a giant target on its back, and it’s not just Microsoft taking aim. Apple also faces challenges from Google, Amazon and a plethora of mobile device manufacturers. While Apple is handily beating its competition today, the status quo could change at any moment.

And while Apple fends off Android, PCs and competing tablets, it has its eye on creating a post-PC world. Rather than compete on hardware specs, it competes on design and user experience. Its a world of mobile devices that Apple intends to dominate for decades to come.

jobs2.jpg

Leading the charge is Steve Jobs, not only the company’s CEO but also its heart and soul. While he’s currently on medical leave, he did show up for the unveiling of the iPad 2, demonstrating things aren’t as dire as previously rumored.

Still, Apple will some day have to continue its quest to redefine technology without its iconic leader, and many question whether anybody can provide the design and product vision Jobs has imparted on the company he founded 35 years ago.

Even if you aren’t a fan of Apple products, it’s tough not to be impressed with what Apple has been able to accomplish since 1976. We wonder what products it will create and challenges it will face in the next 35 years. Right now though, the sun is definitely shining down on Cupertino.

Source: Mashable.com

이 글은 스프링노트에서 작성되었습니다.

:

How to make a good tutorial

Education | 2011. 1. 3. 23:13 | Posted by 스마트 안전보건

There are several methodologies for instructional design. And this article is about how well design and develop a tutorial among various instructional methodologies.

162860_190455470969883_100000162943327_780207_7300937_n.jpg

Introduction

Use A short title page

State the lesson goals and objectives briefly, except with children

Give accurate directions and make them available to the learner at all times

Relate what the learner will study to previous knowledge

Avoid putting pretests in a tutorial. Use pretests only when you know they

are needed and use them in separate computer programs whenever possible


Learner control

Give adults more control than children

Always allow control of forward progression and backward review

Allow global controls, rather than occasional control, as much as possible

Always allow temporary termination

When menus are used, they should always be available

Always provide controls for audio, video, and animation (pause, continue,

reply, skip, volume change, and speed change)

Use the mouse for learner control


Motivation

Emphasize intrinsic motivation whenever possible

Consider motivation at macro-level (strategies) and micro-level (lesson characteristics)

Provide an appropriate level of challenge

Arouse and maintain curiosity

Enhance imagery and involvement through fantasy

Provide an appropriate level of learner control

Arouse and maintain attention throughout the lesson

Content should be relevant to the learner and the relevance should be made clear

Provide opportunity for success and satisfaction through appropriate

goals, reinforcement, and fairness

Apply motivation techniques in moderation, intelligently, and in harmony

with other instructional factors


Presentation of information

Presentations should be short

Layouts should be attractive an consistent

Avoid scrolling

Use conventions in paragraphing, keypresses, directions, and response prompts

Use graphics for important information, analogy, and cues

Keep graphics simple

Use color sparingly and for important information

Avoid color in text

Text should be lean, clear, and have good mechanics

Stress clear transitions between presentations on different topics

Use appropriate organizational methods for verbal information, concepts, rules,

and principles, and skills

Provide procedural help and make it easy to request


Questions and responses

Ask frequent questions, especially comprehension questions

Use the mouse for responding whenever possible

Put the typing prompt below the question and the left margin

Questions should promote response economy

Ask questions about important information

Allow the learner more than one try to answer a question

Do not require the learner to get a correct answer without help to proceed

Give help on response format whenever necessary

Alternate-response questions are harder to write, easier to judge, and allow guessing

Constructed-response questions are easier to write, harder to judge, and prevent guessing

Foils on multiple-choice questions should be plausible

Fill-in questions should have the blanks near the end

Be aware of whether you should be testing recall or comprehension,

and use appropriate question types

Reading difficulty should be appropriate to the learner's reading level

Avoid abbreviation and negatives in questions

Questions should never scroll out of view

Questions should appear after information in a lesson and below information

on a particular display

Global learner controls should still be available during questions


Judging responses

Judge intelligently, as a live instructor would. Allow for word order, synonyms,

spelling, and extra words

Look for both correct responses and expected incorrect responses

Allow as much time as the learner needs for a response

Allow the learner to ask for help, and to escape

Providing feedback about responses

If response content is correct, give a short affirmation

If response format is incorrect, say so and allow another response

If response content is incorrect, give corrective feedback


Remediation

Provide remediation for repeated poor performance. This might be

a recommendation to restudy or see the instructor

Sequencing lesson segments

Overall sequence should be hierarchical or based on difficulty

Avoid simple linear tutorials. Provide branching based on performance

The learner should control progression. Never use timed pauses

Provide restarting capability

Give sequence control to mature learners

Always permit temporary ending based on learner choice

Permanent ending should be based on learner performance


Closing

Store data for restarting

Clear the screen

Make the end obvious with a short final message

Return the learner to where he or she started before the tutorial

이 글은 스프링노트에서 작성되었습니다.

:

General features of designing learning software

Education | 2011. 1. 1. 14:38 | Posted by 스마트 안전보건

This is general features that instructors should take into account

when they develop learning software such as text, video, or web.

168769_189815524367211_100000162943327_770798_6246631_n.jpg


Introduction

Use a short title page

Provide clear and concise directions

Allow user identification


Learner control

Use the mouse

Use keyboard also for more expert users

Use buttons for local controls

Use menus for global controls

Provide controls that are obvious and easy to use

Use cursor changes, rollovers, and confirmation with controls

Provide consistent position, appearance, and function in controls

Design controls in accordance with your users and your content

Make controls and directions for them visible only when available


Presentation of information

Be consistent

Use presentation modes appropriately (e.g., text, sound, video)

Text should be lean, clear, well formatted, and at an appropriate reading level

Use graphics and video for important information

Video should be short and controllable

Use speech to catch attention, give directions, and facilitate dual coding

Maintain good color contrasts, such as between foreground and background


Providing help

Procedural help should always be available

Provide context-sensitive help

Use rollovers as a form of constant help

Always provide a help button when help is available

Provide help in a manual for starting the program


Ending a program

Distinguish temporary versus permanent termination

Always allow temporary termination

Provide safety nets when the learner requests termination

Give credits and a final message at the end

이 글은 스프링노트에서 작성되었습니다.

:

Top 10 strategies for a successful E-learning

Education | 2010. 12. 17. 07:48 | Posted by 스마트 안전보건

Many tasks, roles, and tools are required to design and develop robust,

effective e-learning.

By Mark Steiner


Today’s wide blend of technologies enables an extraordinary range of cognitive, affective, and social enhancements of learning capabilities. Advances in collaborative learning and experiential simulation enable a variety of guided and inquiry-based learning that cross the barriers of distance and time. Through a mixture of instructional media, learners and educators can experience synchronous and asynchronous interactions.


This article focuses primarily on asynchronous learning, specifically constructing self-paced e-learning courses, though these strategies could be applied to a variety of learning design and development situations. Designing and developing robust, effective e-learning is not easy. Many tasks, roles, and tools are required to complete the process successfully. Here are 10 of the fundamentals critical to success.

 
  1. Educate the client on the fundamentals of e-learning. Regardless of a client’s level of e-learning awareness or sophistication, an educational process must occur. This is true whether it is an internal or external client. Even among experienced professionals within this industry, individuals undoubtedly have varying nomenclature regarding roles, processes, and tools. It is essential to educate your client on roles, processes, tools, options, costs, feasibility, and consequences to ensure all parties are operating on similar assumptions and guidelines. You and your client should approach the endeavor as a partnership. Assist your client in realizing what an integral part it is to the process. Build trust with your client by providing it with sensible, honest, pragmatic expertise. However, don’t be afraid to exert control and don’t be afraid to say no. Remember it’s your responsibility to set and control the client’s expectations.
 
  1. Determine the actualtraining need or gap. If training is not the solution to the problem, you are guaranteed to fail. It is doubtful either you or your client desire such an outcome. To help ensure determination of the actual deficiency, perform a thorough analysis, working closely with your client. Begin your analysis with what your client thinks is wrong, then dig deeper, utilizing your previous experiences, education, and intuition. There are a variety of resources that can assist individuals and organizations in enhancing and strengthening their analysis process.
 
  1. Define your process and communicate it, focusing on key review points in the cycle. The design and development of e-learning is often a complicated collision of ideas, tools, roles, people, technology, and desired outcomes. You and your client want predictable results. A well-defined, reliable process is the clearest way to get the desired results. What activities are to occur? When will they occur? Which ones must be completed before other activities can begin? It is important to make your client aware of its responsibilities: specifically inputs, review cycles, and corresponding impacts


Mark Steiner is president of learning solutions firm mark steiner, inc. Visitwww.marksteinerinc.com for more information.

Read more at www.trainingmag.com


이 글은 스프링노트에서 작성되었습니다.

:

DVD ripping applications for Mac OS X

Creativity | 2010. 11. 28. 22:06 | Posted by 스마트 안전보건

Now a day’s DVD Rippers are essential to rip DVD’s into various formats.

Here we are providing you with the Top most DVD Ripping and Encoding

software for Mac that will be useful for you guys to know except handbreak

as we all are well familiar with it.       


mac
 

1. Mac Wondershare DVD Ripper


When talk about DVD ripper softwares then Mac Wondershare DVD Ripper is all what you want. For Mac users this DVD converter is the tremendous tool to split the DVD into a variety of audio and video formats for just $ 45.00.


2. Mac iSkysoft DVD Ripper


Mac iSkysoft is absolutely compatible With Mac OSX Snow Leopard. This DVD Ripper provides ease to the Mac users as it converts homemade DVD or encrypted one into portable devices example iPhone, iPod or to any video format that is it can be AVI, FLV, MPG and so on. It is available for $39.00.


3. Mac Aimersoft DVD Ripper


This is perfectly suitable for Mac users and provides support to Mac OS X Leopard. By using Aimersoft you can rip your DVD into different formats and then easily rip those movies on your portable devices for $39.00.


4. Top DVD Ripper


The specialty of Top DVD Ripper is that it allows you to preview the movie before it converts, modify video size and quality, audio channel, files convert in batches and many more features at a price of $34.99.  


5. Mac Xilisoft DVD Ripper


Xilisoft provides many additional features like copping frame size, effects and subtitle can be adjusted, merge or split files and can also add water mark at a cost of $39.95.

Read more at www.topintheworld.com

이 글은 스프링노트에서 작성되었습니다.

'Creativity' 카테고리의 다른 글

Best Camera Phones of 2010  (0) 2010.11.30
E-mail Commander 1.5.1 for Mac  (0) 2010.11.30
iOS4.2 Released  (0) 2010.11.23
5 design trends in 2011  (0) 2010.11.23
4shared Desktop for Windows7, Mac, Linux  (0) 2010.11.23
: